Wednesday, October 31, 2012

Premiere of Ozwald Boateng's "A Man's Story"


Last Friday evening in the screening room of the trendy Crosby Street Hotel, in Soho, I was able to have a behind the scenes look at the premiere of "A Man's Story". This documentary chronicles the life and career of British menswear legend Ozwald Boateng.  This film explores Mr. Boateng's world of high fashion.  However, unlike many fashion films, "A Man's Story" portrays his life in a realistic way bringing up real issues of family and bankruptcy. As an aspiring fashion designer myself, it was very interesting to meet Mr. Boateng and hear more about his career and experience making the film.

Ozwald Boateng and I!
I had the pleasure of filming for reporter Jack Belisle, who is a very professional and experienced videographer ~ see his short films and work from the New York Film Festival on his YouTube Channel.


I hope Jack's video transports you to the premiere and gives you a better understanding of the talented, handsome, and inspiring designer, Ozwald Boateng.   

Enjoy,
Margo Isadora

Jack Belisle Prepping for the Carpet
See the film in New York after November 2nd!

Friday, October 26, 2012

An Afternoon with Advanced Style!

Ari, Me, and two women in his book Carola Vecchio and Ilona Smithkin! 

Ari Cohen is not your average street style fashion photographer.  He is not out looking for the young trendy girls, instead he wanders New York searching for true personal style in the most fashionable and creative older ladies and gentlemen of the city. He believes that personal style advances with age, and he conveys this message through portraits and interviews of these incredible individuals on his blog Advanced Style.  


Ilona Smithkin
Check out those mile long lashes! 
Blind Contour Drawings I did this evening after meeting Ilona

As a longtime follower, it was an absolute treat to meet Ari and my favorite muse of his, Ilona Smithkin, today at Strand Bookstore in the West Village.  It was a small impromptu book signing, which was lovely as I got to chat with Ari and the attendees as well as hear Ilona's wonderful stories!   His blog is filled with unique individuals who I have always felt would be incredible to meet.  After meeting one, I now realize that the videos and pictures don't do justice to how inspiring these people really are. 

I met Tom, a wonderful artist and blogger at the event, see his post for more from the signing.


This video sums up what I love most about Advanced Style!

Ilona has had a whirlwind life, she spoke of her visits to Italy, her work as an artist, and even spoke in her native German with an attendee.  I asked her about her extravagant orange eyelashes, to which she responded that she had them made by a man in Paris for many years. When he passed away, she decided that she would try to make them herself!  After much patience, she has perfected them and has worn the same pair, made from her own locks, for the past 27 years!  There is much more to learn about this inspiring woman, watch her come to life through videos on Advanced Style!

Enjoy learning from these creative, youthful, and spirited souls!
~ Margo Isadora 


Ilona and I!

Monday, August 13, 2012

Yayoi Kusama at the Whitney


    Yayoi Kusama's current exhibition at the Whitney introduced me to one of the most interesting and talented artists that I have ever encountered.  Kusama's breadth of work, spanning from the 1940's to the present, has such incredible variety including  painting, sculpture, large scale installations and public art.  Kusama has lived in a psychiatric hospital, by her own decree, for the past 30 years, and continues to create.
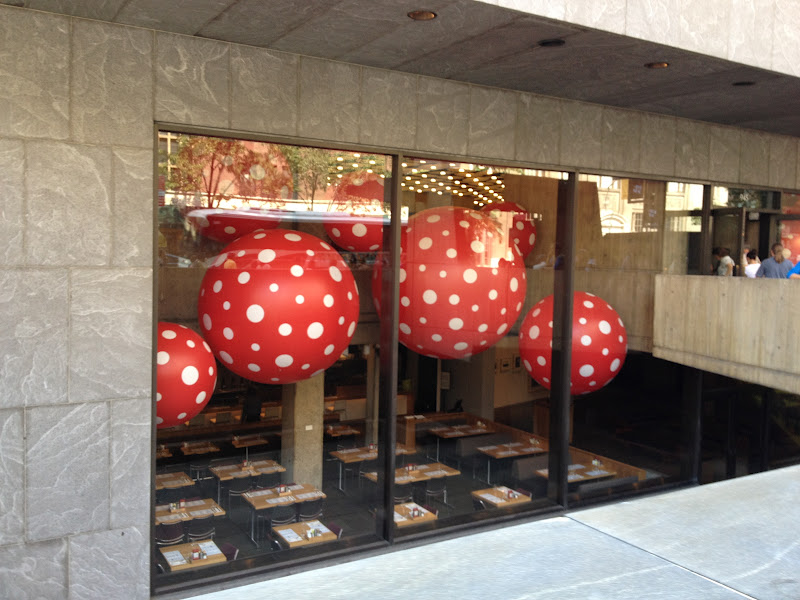
    Kusama is known for her work with polka dots; from covering canvasses with white dots, to naked people in red dots, to her current large scale bright and graphic canvas paintings, each piece speaks volumes.  To pay homage to her my friend Piper, my grandma, and I wore polka dots when we visited the show a few weeks ago.  
    Each of us left with a different favorite period or piece of work, but all of us felt fortunate to know more about such an interesting woman after visiting the exhibit.  Upon exiting we each entered 'Fireflies on the Water' which was a meditative and eye opening experience.  This installation was inspired by a previous work of Kusama, and was a room of mirrors, with hanging strands of lights, and a small platform surrounded by water- where each of us got to spend a minute alone viewing ourselves amongst the endless abyss of lights, before we exited into the reality of the museum and the city.
    Piper gained her own inspiration from Kusama and shot an incredible self portrait series incorporating Kusama's signature red dots.  Let Kusama inspire you as well when you visit her exhibit at the Whitney through September 30,2012. This is one not to MIS!


Enjoy, 

Margo Isadora
Dot Girls
Dot Balls from the Opening Party
A visitor all decked out in dots...
(His pants have tiny white dots as well!)
I loved Grandma's dotted pants!
Kusama Herself!
A captivating Kusama print...

Photo from Online
Kusama in the exhibit with her most recent work.
Photo by Steve Eichner


"Fireflies on The Water"
Photo by Piper Martz
Piper Martz's Stunning Self Portrait Inspired by Kusama.


Thursday, July 19, 2012

Project Runway Premiere Prep

Project Runway Rice Krispy Treats!
 The premiere of Project Runway is a much anticipated event at my house.  The promise of a new season with a creative competition filled with talented designers always inspires me.  To prep for our viewing party this evening (as Project Runway Premieres tonight on Lifetime at 9/8c) I made PR Rice Krispy Treats and PR Watermelon! Wanted to share these two easy DIYs that can make any party festive.  Hope you are watching Project Runway tonight ~ I'm looking forward to watching the designers "MAKE IT WORK!"


Enjoy,
Margo Isadora


Project Runway Watermelon!

DIY : Cut your watermelon into large pennies
about an inch thick and then cut out the letters
you need with alphabet cookie cutters or carve
them with a knife.

PR Watermelon

Rice Krispy Treat DIY 
Supplies :
6 cups Rice Krispies, 1 bag Marshmallows, 3 Tbsp Butter
1) Melt butter, then melt marshmallows.
2) Once marshmallows are melted turn off
your burner and mix in the krispies!
3) Mix until combined.
4) Lay on wax paper and start to shape
your letters once they have cooled a bit!
I've tried PR for the premiere,
ART for an AP Art Party and
$ for the last day of Macro Economics!

Hope you enjoy tonight's Premiere at 9/8c on Lifetime!
Piper and I with our PR Treats!

Monday, July 16, 2012

Stencils and Spray Paint!

Medallion Stencil
Stencils and spray paint create vibrant and stunning wall art, wrapping paper, cards, and can add a great decorative element wherever one is needed.  I created this stencil by tracing the plastic top of a thrifted side table and cutting out the pieces.  I then replicated this incredible medallion onto newspaper and butcher paper ~ creating endless possibilities...  Find a stencil you love, make your own, or use cool household items like doilies, lace, or interesting radiator screens, and get spraying!  Use a multitude of color to enhance your design, don't be afraid to experiment.  Some of my best results came after I stamped my sprayed stencil multiple times on newspaper; as the colors began to blend interesting effects were created. 


I chose to stencil on paper, which I used for cards, wrapping paper, and wall art, but feel free to think outside the box.  Stencil the top of a table, like Elsie did on A Beautiful Mess, or paint it directly onto your wall for some easy DIY wall art.  Please share your favorite stencil inspired projects with me! 


Enjoy,
Margo Isadora
Thrifted Plastic Table Top
(I traced it to create the stencil.)

Supplies: Stencil, Paper/Newspaper, Spray Paint

Lay your stencil flat, and spray away!
(Be sure to keep your spray paint a foot or more
away from your paper to avoid puddling)

Move your stencil and layer on other colors! 

When your stencil gets nice and wet from previous sprayings,
flip it over to create an awesome stamp!

Tie Dyed Stamping
You never know what you're gonna get!

A line of stenciled medallions!

DRYING!
*** Leave your spray painted papers outside for as
long as possible, they smelled fumey for a day or two.

Stenciling can also be done using paint and doilies!

Spray heart doilies on cut newspaper letters
for a great Valentines Day card!

Wrap up presents in your DIY paper for a special gift!

The possibilities are endless!

Tuesday, July 10, 2012

Snail Braids

A Self Portrait
(One of my snail braid looks drawn in colored pencil!)
I am always looking for ways to stay cool in the summer, and a great summer braid is always on the top of my list.  These snail braids, or "exotic hairstyles" as my twin brother calls them, are a stylish way to stay cool and are quite simple to do.  

Start by french braiding your hair from the top of your head. Instead of braiding to the base of your head, braid around your head, forcing the braid to go in a different direction.  Check out this video on Free People's blog for further snail braiding instruction.  Zig zag your french braid and finish it off like a regular braid with an elastic at the end.  Leave as is, letting the braid rest on your shoulder, or twist it up and pin it, with bobby pins, into a low bun.  

I wanted to share some of my 'exotic' hairstyles and other looks I love for a bit of inspiration.  Please let me know about your favorite summer styles as well!

Enjoy,
Margo Isadora

An exotic hairstyle worn on a hot
day on the Highline in NYC!

Highline look from the side!

Highline top view.

Miscellaneous braided day!

And from the top!

Some of my other favorite styles...

The braids are woven with yarn and piled
like a beehive for a Halloween 'do!
Cute Banded Pony!
by Camille Styles

Fabulous Fishtail!
by A Beautiful Mess
Four Summer Buns!
by A Beautiful Mess

Friday, July 6, 2012

Fringe Tee Shirt Bags

DIY Queens with their Fun Fringe Bags!

There is nothing more fun than getting together with friends and DIYing summer accessories!  Recently some of my young friends came over for a DIY class and we had a ball.  Each girl made a great fringe beach bag out of an old tee shirt and created cool accessories to match!  The girls were all clearly DIYers at heart, so it was a treat to be able to work with them.  Check out our fun projects and the fringe bag tutorial below. This is an easy summer project not to MIS!

Enjoy,

Margo Isadora

Tie Dyed Fringe Bag!


Finished Fringe!

Hard at work on a second bag!

Already a DIY expert, check out that shirt!

Tied!

On to accessories, ripping away!

Tee Shirt Fringe Necklace and Pom Pom Hair Tie!


Tee Shirt Pom Pom Hair Tie!

Every DIY girl needs a Tootsie Pop break!
Now Do It Yourself!

Supplies: T-Shirt and Scissors

1. Cut off sleeves.

2. Cut off neck of shirt, following
the line of the front.  

3. Cut off Bottom of Shirt

4. Cut 1" fringe strips, about 5 inches up.

Fringe

5. Pull each fringe piece so it creates a clean coil.
Fringe Perfection

6. Double knot each piece of fringe
to the one directly behind it.
This creates the bottom of your bag!

One knot down, a whole bunch to go!


Finished Fringe Bag!

Play with your leftovers...

I created a fringe necklace, similar to these!
Have fun with it
Enjoy your summer fringe satchels and other accessories!